FAQs and Support
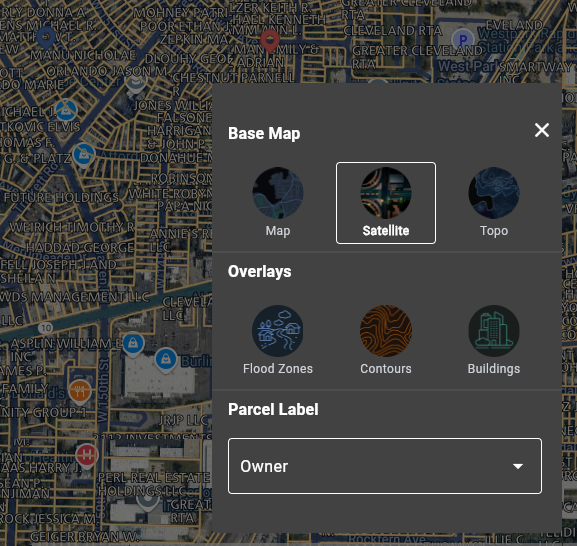
How do I change the look of the map or how parcels are labeled?
LandGlide® offers three base maps:
- Street Map
- Satellite View
- Topo (USGS topographic view)
To change the base map, click on the Map icon on the bottom right of the map. It is the top button of the three on the map screen. Then tap the Layers icon and tap on the Base Map view you would like to see, and that will appear.
Along with the Base Map, you can choose an Overlay to be shown on the map. The available overlays are:
- Flood Zones
- Contours
- Buildings
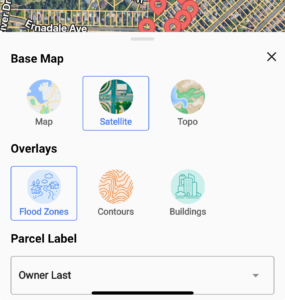
From this same menu, you can change how the parcels are labeled. Once again, tap the Map icon to start. Tap on the Layers icon, then tap on Labels. From here, you can choose one of the six options for labeling the parcels.
- Owner
- Owner Last (Last name only)
- Street Address
- Street Address Number
- Parcel ID
- None
For web users: Click the Map icon on the right of the map

This will bring up the Map View options. Click the options you prefer to change how the map looks.
How do I use the Measure feature?
NEW!: To see our Video FAQ on this topic, please click here.
LandGlide’s Measure tool allows you to measure the distances between points of your choice on the map and calculate the area and/or perimeter of an area you define.
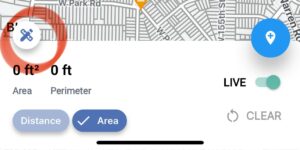
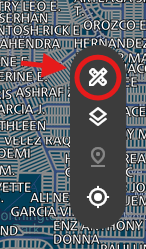
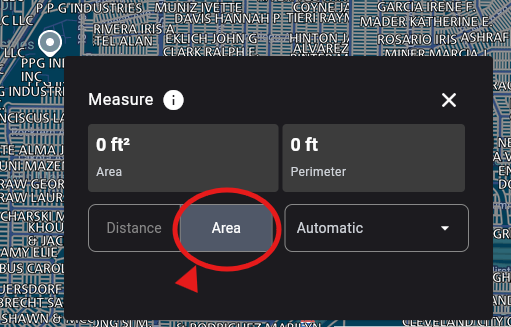
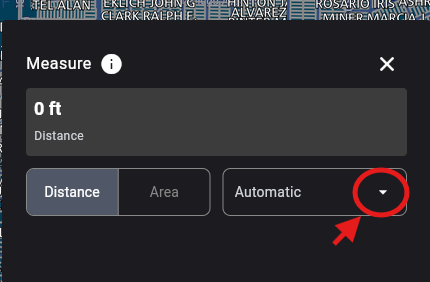
To start, from the mobile app, tap the Map icon on the right side of the map and then tap the Measure icon. By default, you’ll be measuring the distance between points, but you may select the ‘Area’ button at the bottom left to see both the area and perimeter.
Choose your first point by scrolling the crosshairs to a point on the map you would like to start. When you have the crosshairs on your first point, tap the Drop Point icon on the bottom right of the map. This will mark your spot with a dot labeled 1 in it to indicate it is your starting point. Scroll through the map again until you have the crosshairs on your second point. Tap the Drop Point icon to set your second point. The distance will now appear in the measurement bar at the bottom of the screen. Continue this process until the desired measurement area is defined. You can tap on the measurement to copy the information to the clipboard.
To calculate Area and Perimeter, add at least 3 points to the Map and select Area in the Measurement Display bar. The area and perimeter displayed will update as you continue to add points. You may continue this process until the area you wish to measure is complete. You can tap on the measurement to copy the information to the clipboard.

Make a mistake or drop a pin inadvertently at any point; you can correct this by either using the Undo arrow next to the Drop Point icon to remove the last pin or tapping Start Over in the lower right corner to remove all the pins and start again.
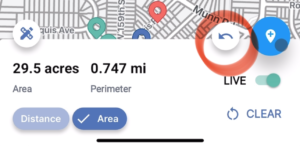
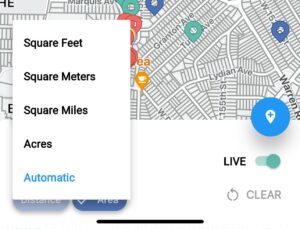
You can change the units of measurement displayed by tapping the Measure button at the bottom left of the map. If you select Automatic, it will automatically adjust the units based on the magnitude of the measurement. For example, if you measure something that is 10 feet long, you’ll see the units in feet, but then when you measure something that’s 100 miles long, it will “automatically” change the units to miles rather than feet.
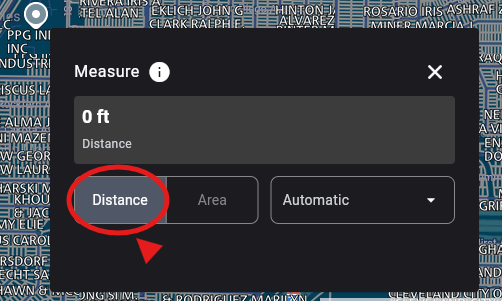
For web users, the Measure icon is the crossed pencil and rule icon on the right side of the map.
To measure the Distance between points, click on the Measure icon and click Distance in the box that appears. Click anywhere on the map to drop a point. Continue to click to drop points until you have all your points set to show the calculated distance.
To get an area measurement, click on Area in the Measure box and set your points the same as you would for measuring distance, by just clicking the points on the map.
You can change the units of measurement by clicking the drop-down box to the right of Area. Here you can see the available units of measurement to use.
When you are done with either measurement on screen, click the Clear just at the bottom of the box to clear the measurements off the screen
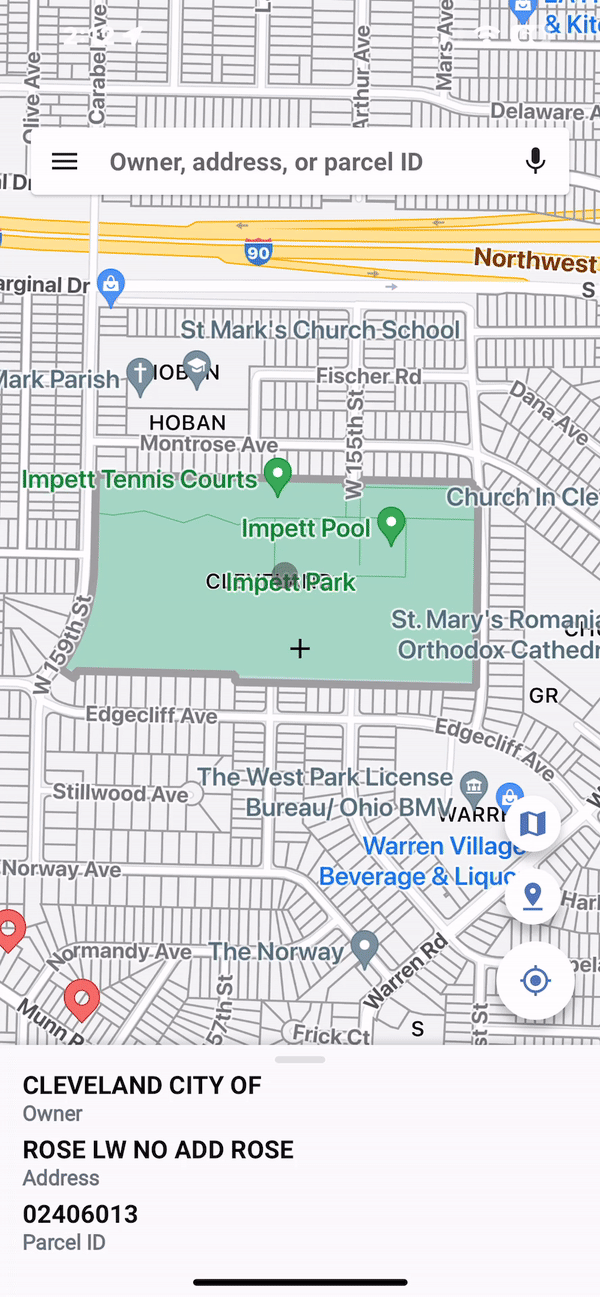
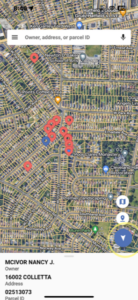
How do I search in LandGlide®?
You can search for a property by entering the Owner’s name, Address, or Parcel ID into the search box. By clicking one of the search results, the map will zoom to that parcel.
And now, with the latest update to our mobile app, you will access data even faster and more efficiently with autocomplete and recent searches.
AUTOCOMPLETE:
LandGlide’s Autocomplete returns a list of matching results as you type, allowing you to find and select the parcel you are looking for faster, more accurately and without having to type the entire owner’s name, address, or parcel number. Click see all to expand the list and narrow your result to just one category type. You can turn off Autocomplete by going to Settings and switching the toggle off.
RECENT SEARCH
With Recent Search, you will have access to any recently selected search results, saving time and effort. This allows you to be able to quickly access recently selected properties and find parcel data quicker and easier. Just click in the search box to access your recent searches. You can remove a property from your Recent Search list by clicking the X next to the property. Recent searches can also be turned off by going to Settings and switching the toggle off.
Once you have reviewed the information, you can get further information by clicking the County Link to go to the county site, or you can go back to your search results to choose another property from your search.
If you prefer, you can browse the map by dragging it in any direction. On your computer, you can zoom in and out by using the scroll wheel on your mouse or the +/- buttons in the map’s upper right on your computer. On your mobile device, simply use your fingers to zoom in and out as you would on any map app.
If you wish to go back to your location at any time, simply click the Location icon.
Can I export my saved locations?
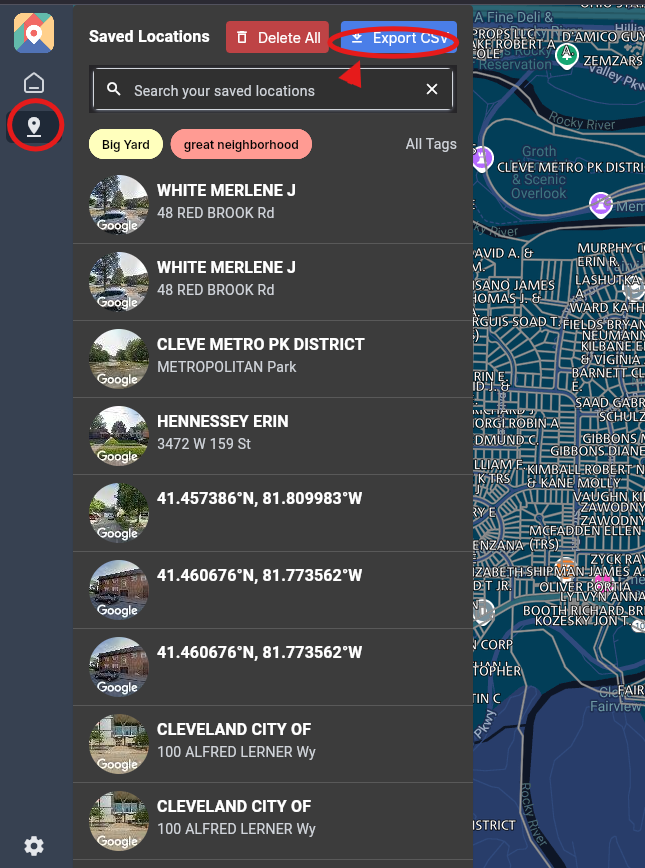
LandGlide® allows for the exporting of saved location data as a CSV file. On your mobile device, tap the Menu icon (the 3 horizontal lines at the left of the search bar) and choose Saved Locations.
From Saved Locations, tap on the three dots (…) in the upper right corner of the screen and then tap Export CSV. A CSV file will be created that you can email to yourself or your colleagues.
When using LandGlide® on the web, select the Saved Locations icon. Click the “Export CSV” button to download a CSV of all your Saved Locations.
How do I see my dropped pins (Saved Locations)
NEW!: To see our Video FAQ on this topic, please click here.
On your mobile device, you can manage your dropped pins by clicking the Menu icon in the upper left corner and then selecting Saved Locations. Here, you will see a list of your saved locations. You can search the list of Saved Locations by tapping the magnifying glass at the top of the page. You can choose the tag you wish to see by tapping it at the top of the screen.
Once you have chosen a saved location, you can customize the pin.
The Edit Location section allows you to:
- Change the Pin Color: Choose what color you would like the pin to be by tapping one of the four color pins LandGlide® offers.
- Add a Note: Add details about a Saved Location by typing a quick or detailed note.
- Add a tag or create a new tag: Make your Saved Locations more searchable by adding Tags. Just type out the tag you would like to add and tap the plus button next to the Tag to add it. Tags also let you group pins together to categorize them.
- Add additional images: This feature allows you to take a photo or upload one from your image gallery to the Saved location. Just tap Add Image and tap Add Image again on the Images page to get started. Once you have uploaded a photo, you can add more photos by tapping the upload button in the bottom right of the Images page. When you are done adding images, click the checkmark in the upper left. Please note, at this time you may upload no more than 5 images for each saved location.
When using LandGlide on the web, you can manage your dropped pins by clicking Saved Locations from the gray bar on the left side. Here, you will see a list of your saved locations. You can search the list of Saved Locations using the search bar at the top of the page. You can choose the tag you wish to see by tapping it at the top of the screen. Click All Tags to see more tags.
Once you have chosen a saved location, you can customize the pin.

The Edit Location section allows you to:
- Change the Pin Color: Choose what color you would like the pin to be by using the drop down menu.
- Add a Note: Add details about a Saved Location by typing a quick or detailed note.
- Add a tag or create a new tag: Make your Saved Locations more searchable by adding Tags. Just type out the tag you would like to add and tap the plus button next to the Tag to add it. Tags also let you group pins together to categorize them.
- Add additional images: This feature allows you to take a photo or upload one from your image gallery to the Saved location. Just tap Photos at the top of the page and tap Add Photo on the Photos page to get started. Once you have uploaded a photo, you can add more photos by tapping Add Photo again. Please note, at this time you may upload no more than 5 images for each saved location.

How can I save a location (aka Drop Pin)?
Dropping and saving a pin on a mobile device
Any location can be saved with the Drop Pin feature.
On your mobile device, you can drop a pin by just tapping the Drop Pin icon. This button can be found just below the Map icon in the bottom right corner of the map.

The pin will be dropped wherever the crosshairs are in the map area, so make sure they are lined up before you drop the pin.
Customizing the Pin
If you tap the pin right after dropping it, you will be taken to the Saved Locations page to customize the pin. On this page, you can change the pin color, add a note, add a tag to help you organize your pins, add additional images, view the location on the map, and delete the location. You can also click the County Link button to be taken to the county website for the location. Clicking the Navigate button will assist you with navigating to the location using the navigation app on your device. The send button allows you to send a link to this location to a friend. Please note, your friend must also have LandGlide installed to access the location.
You may also access the saved locations by clicking on the Menu button at the top of the map screen and selecting Saved Locations.
Dropping and saving a pin on the web
There are two ways to save a location (drop a pin) while using LandGlide®.
Left-click on a parcel to bring up the parcel information. If you would like to save this location, you can click on the Drop Pin icon on the map’s right side. This will drop a pin in the center of the parcel and will add this parcel to your Saved Locations.

Right-click with your mouse on a parcel to select it and bring up the Add Pin pop-up. Select Add Pin, and the parcel will be added to your Saved Locations. By using the right-click method, you can drop a pin in a specific area of a parcel.
You will see a pin on the map for all the locations you have saved. In the web version of LandGlide®, you can also add more details for a pin from the “Saved Locations” page. To do this, select Saved Locations from the top menu and locate any pin(s) that you’d like to modify. Just like in the mobile version, you can set the pin color or add tags and notes, etc.
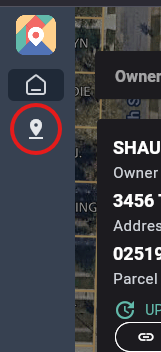
How do I get LandGlide® to follow me?
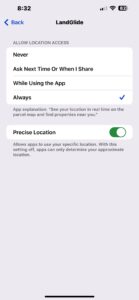
On your mobile device, be sure you have permitted LandGlide® to use the location on your device. If you are unsure of how to enable your phone to allow LandGlide to use your location, please get in touch with us with your phone’s make and model so we can assist you.
Next, in LandGlide®, you want to find the Location icon (seen circled in yellow in the picture) in the lower right corner of the map view.
Click the Location Icon once to have LandGlide® track you. When you do this, the Location icon will change colors; this means you are in Follow mode.
If you click the button again, LandGlide will go into Compass mode; the Location icon will become an arrow.
LandGlide® is not working, help!
If LandGlide® is not working on your mobile device, you may need to clear cache within the LandGlide® app. To do this, open LandGlide® and click on the Menu icon (the 3 horizontal lines) at the left of the search bar. From the menu, choose Settings, click Clear Cache, and then click Ok in the pop-up box confirming that you want to clear your cache.
If the problem persists, try uninstalling the app from your device then reinstalling it from the app store.
If you’re having issues using LandGlide® in a web browser, try clearing your browser’s cache, closing all browser windows, relaunching, and logging in again.
If this does not fix the problem or if you have trouble using LandGlide® on your computer, take a screenshot of the problem or error message, and email it, along with a description of the problem, to support@LandGlide.com.
I bought a new phone, how do I get my paid LandGlide subscription on it?
When adding LandGlide® to your new mobile device, download LandGlide® from the app store and sign in using the same login method as the one you accessed LandGlide with on your previous device. The app will recognize your subscription and should not ask you to subscribe again.
Can I add LandGlide to a 2nd device?
LandGlide® now gives you access to parcel data on all your devices.
To add LandGlide® to your mobile phone or tablet, go to the app store for your device and download LandGlide®. Once the app has been downloaded, log in to LandGlide®.
Be sure to log into LandGlide® with the same method on BOTH devices. The app should recognize you have a paid subscription and allow you to start using LandGlide®.
To access LandGlide® on your desktop or laptop computer, go to https://app.landglide.com, and log in to LandGlide® using one of the sign-in methods available. Please make sure the email address associated with that login method is also associated with your LandGlide subscription.
Can I use LandGlide® on my desktop computer?
Yes! You can now use LandGlide® on your computer as well as your mobile devices. Just go to LandGlide.com to get started.
How accurate is my GPS location?
LandGlide® relies on the information it receives from your phone GPS/Location Services to show your location. Please be sure you have given LandGlide® permission to use your location and all location services are turned on.
GPS is a system to estimate location on Earth by using signals from a set of orbiting satellites. The GPS system includes the chip in your mobile device as well as the satellites above the Earth.
A recent worldwide study found that GPS-enabled smartphones show positional accuracy within a 4.9 m (16 ft.) radius under open sky conditions. However, the accuracy degrades near structures and tree canopies. Urban areas on average, have more GPS signal bounce, and smartphones can detect satellite signals from a much smaller portion of visible sky.

Examples of GPS Issues
If you experience any of the following while using LandGlide®, your location may appear different than your actual location. Please refer to the troubleshooting steps listed in this answer to prevent similar issues in the future.
- GPS drift: The GPS track deviates from your path. You may see that the track generally follows the shape of the path but with much less precision.
- GPS bounce: A ‘jumpy’ GPS track can cause you to appear in many different areas in a short time frame.
Achieving Good Initial GPS Lock
To achieve fast startup and high-accuracy position estimates, you should provide:
- A clear view of a large portion of the sky. Any obstructions between the phone and the sky can adversely affect signal strength. A big tree is an obvious obstacle, but even a pocket or a backpack can cause problems for the very low-strength signals.
- Time to tune-in to the signals from the satellites. To improve signal acquisition time, keep the device in one place and make sure the device’s data communications are enabled. This allows the phone’s GPS to get hints about its approximate location. Even with a perfectly clear sky, it can take a few minutes before a lock can be established in some situations.
- Turn off WiFi as it may be causing conflicting data with your GPS as your mobile devices will try to use it as part of the location services.
Understanding Your Device’s GPS Performance
- Even if your device is in the same place and the settings are the same as before, it may behave differently from one day to the next. Typically, the device needs to receive signals from about 5 satellites to get an accurate estimate of its position. With the changing position of the satellites, changing weather patterns, and the changing nature of the Earth’s outer atmosphere, there are enough parts of the GPS system outside of your direct control and observation that it is difficult to make conclusions about what specifically is causing inconsistent performance. We recommend you try repeatedly before making a judgment about the best ways to work with your device’s GPS.
* Some of the information contained in the FAQ was obtained from GPS.gov. For more information, please click here.
Please note: Geolocation on your computer works a little bit differently from a phone with GPS, which is why you may have different current location results from our LandGlide® mobile app.
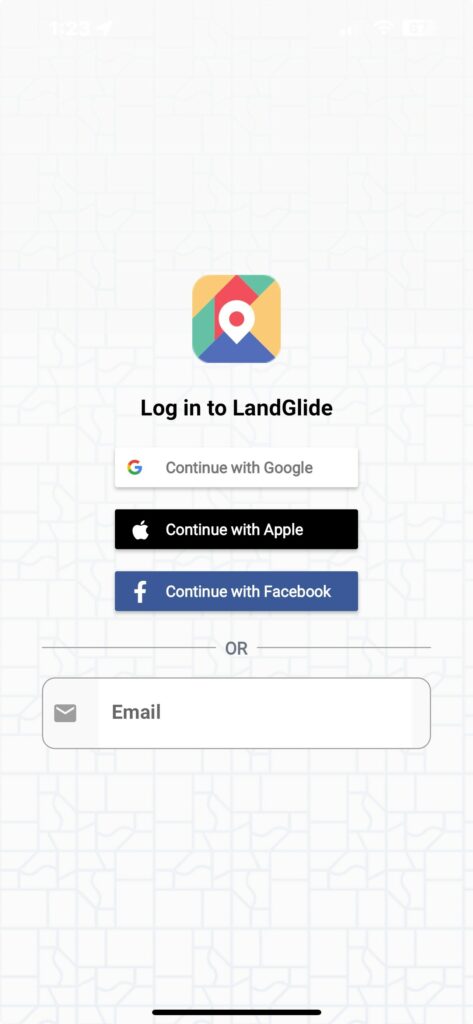
How do I sign in to LandGlide®?
The screen with multiple sign-in options is a new way for us to authenticate your profile. This will allow you to access your LandGlide® account across multiple devices, which will make it easier to use LandGlide®.
Choose the option that works best for you:
- Continue with Google—This option allows you to use an existing Google account to sign in with an associated email address and password. Google may require some additional verification.
- Continue with Apple—This option allows you to sign in using your Apple ID and password. You will be sent a numeric code to authenticate the account as part of Apple’s two-factor authentication process. Please do not select to hide your email, as this will make assisting you more difficult.
- Continue with Facebook– This option allows you to Sign in with your Facebook login credentials. You will be asked to allow Facebook to share information with LandGlide®. You must select Allow to proceed.
- Continue with Email – This allows you to have an authentication link sent to the email address associated with your LandGlide® account. Simply open the email on the device with LandGlide® installed and click the link. Follow the onscreen prompts within the LandGlide® app, and you will be all set.
Can I use my LandGlide® subscription on all my devices (mobile phone, tablet, computer)?
Your LandGlide® subscription allows you to access LandGlide® on all your devices with one subscription. To add LandGlide® to your mobile phone or tablet, go to the app store for your device and download LandGlide®. Once the app has been downloaded, log in to LandGlide® using the same method you have used on your other device.
Be sure to log into LandGlide® using the same method on ALL devices. The app should recognize you have a paid subscription and allow you to start using LandGlide®.
To access LandGlide® on your desktop or laptop computer, go to https://app.landglide.com, and log in to LandGlide® using the login method that is associated with your subscription. Please ensure the email address associated with that login method is also associated with your LandGlide® subscription. If you are unsure what email was used for the mobile device, open LandGlide®, tap the menu (in the search bar), and tap “Account.” Your email should be displayed just under your name.
How do I activate my LandGlide® corporate account?
Activating your corporate subscription is a 3-step process.
- Download LandGlide from the app store on your mobile device.
- Sign into LandGlide.
- Please note that the login email does not have to be the same email where you received your invitation email (below). It can be a Gmail or Apple ID.
- Please make sure if using Apple ID, you do not use Apple’s Hide My Email feature.
- When signing in, you may be prompted to start a trial. Please proceed to start the trial. You will not be charged for a subscription after this trial.
- Connect to the Corporate Account
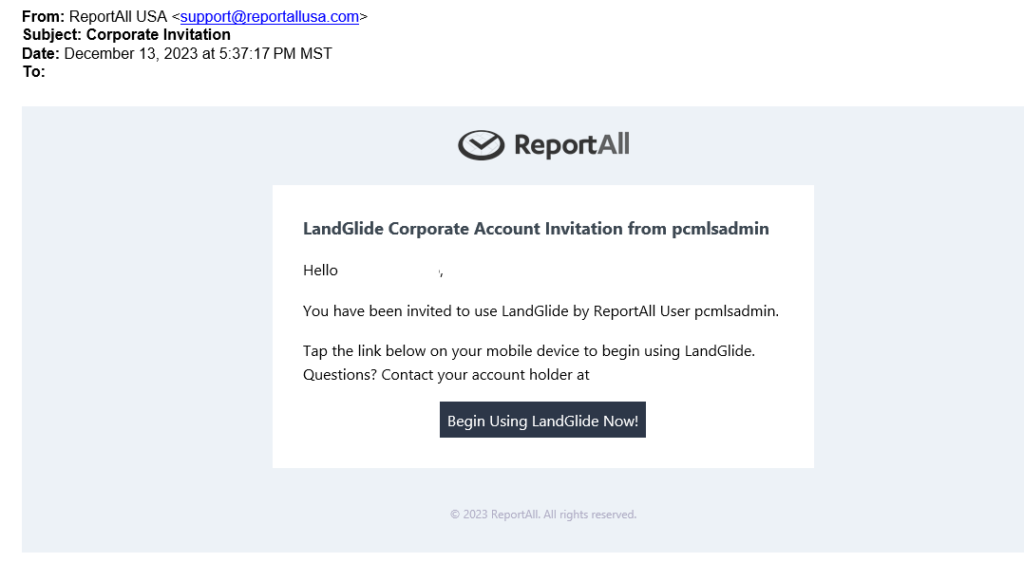
- Open the LandGlide Corporate Invitation email on the same mobile device on which you are signed into LandGlide.
- Click the invitation link in the email to activate your corporate subscription.
Does the LandGlide® app for iOS qualify for family sharing?
Unfortunately, LandGlide® is not compatible with Family Sharing because a subscription is considered an “in app purchase”. For more information regarding what qualifies for Family Sharing, please click the link below:
How do I sign up for LandGlide® Corporate Accounts?
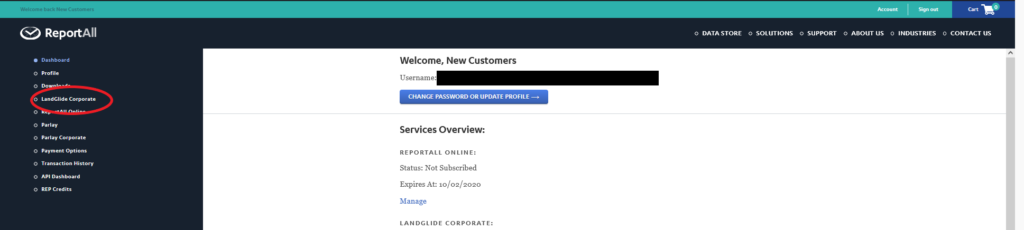
If you have not done so already, you will need to register for an account at ReportAllUSA.com. Once you have registered and verified your email address, sign in and select “Account.”
On the “Account” page, select “LandGlide® Corporate” in the left navigation menu.
You can add yourself or other users by entering their name and email address and clicking the blue plus sign button. If you are adding multiple users, repeat this process until they are all added. Please note that if you will be a LandGlide® Corporate user, you must add yourself as a user.
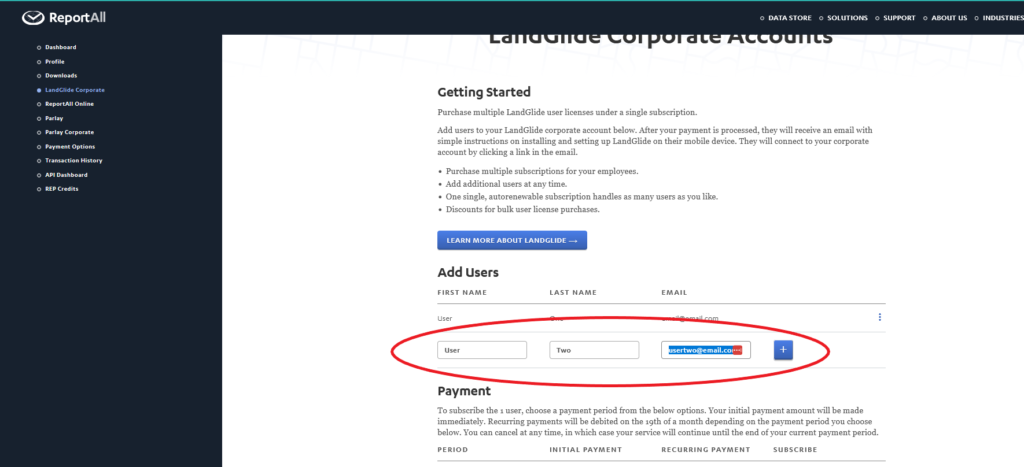
Next, scroll down to select your preferred auto-renewable billing period (monthly, quarterly, or yearly).
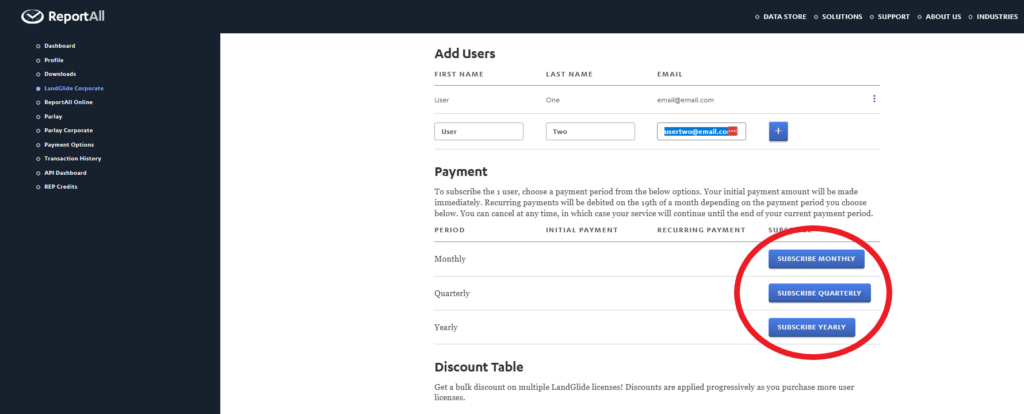
Follow the prompts on the screen to enter your payment information or use the payment method already on file.
Once payment is processed, all added users will then receive an email with an invitation link. To link the LandGlide® account to a mobile device, simply click the invitation link in that email on their mobile device to begin using.
If you need assistance in activating your LandGlide® Corporate user account, please visit the FAQ:
Is there a multi-user discount for LandGlide®?
Is there a multi-user discount for LandGlide®?
LandGlide® Corporate Accounts offers you the ability to purchase and manage multiple auto-renewable licenses to LandGlide® through our website.
We offer the following subscriptions:
Monthly for $9.99
Quarterly for $27.49
Yearly for $99.99 (Best Value)
**Note: These subscription prices are per user.
You will receive a discount for purchasing additional subscriptions. We offer a progressive discount per the schedule below:
LandGlide® Corporate Account discounts:
2-5 Users – 10%
6-10 Users – 15%
11-20 Users – 25%
21-50 Users – 35%
51-100 Users – 45%
100+ Users – 50%
If you would like more information, need a quote, or would like to speak with a member of our team about a LandGlide Corporate account, please click here.
How do I cancel or unsubscribe from LandGlide®?
If you’re using the free trial, you will not be auto-enrolled when it ends. You will receive a prompt to purchase a subscription. If you choose not to subscribe, just uninstall the mobile app and/or log out of the web application.
If you are an Apple subscriber, please click the link to see instructions on how to cancel:
https://support.apple.com/en-us/HT202039
If you are a Google Play Store subscription, please click the link to see instructions on how to cancel:
If you subscribed through LandGlide.com, please follow the instructions below on how to cancel:
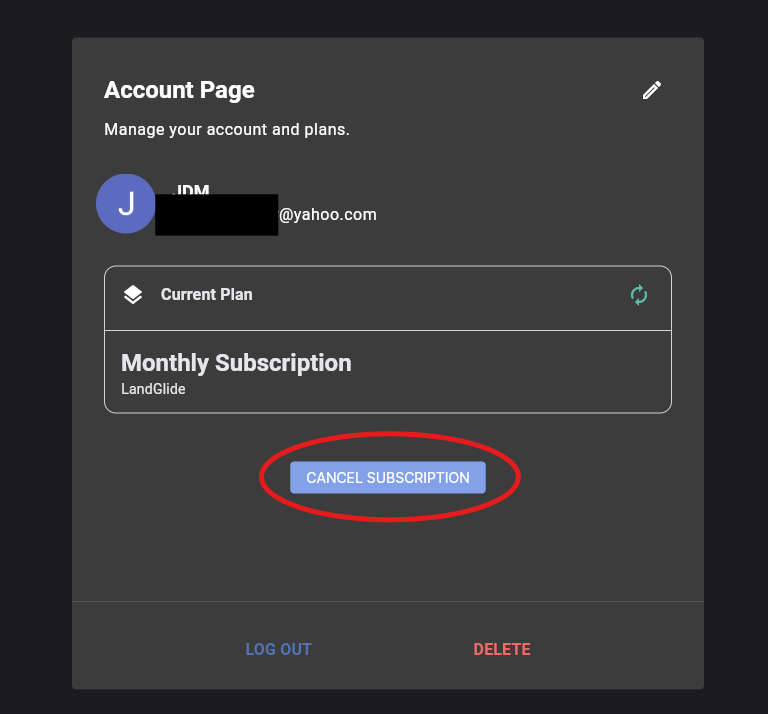
- Go to LandGlide.com and sign in if you have not already done so.
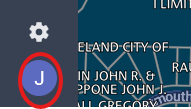
- Click on the blue circle with your initial in white at the bottom left of the screen.
- On the Account Page, under Current Plan, you will see the button to Cancel Subscription.
Click that button and confirm your request to cancel
Once your subscription is successfully canceled, you will receive a message on your screen reading: You have successfully canceled your subscription.
We appreciate you using LandGlide; we hope to see you again.
Important: Uninstalling an app will not automatically stop a paid subscription. You must cancel a paid subscription to end it. You will still be charged if you uninstall the app without canceling a paid subscription.
How do I purchase a subscription to LandGlide®?
To start, visit the app store for your mobile device and download LandGlide® to begin your free trial. After you are done enjoying your 7-day trial, you will be prompted to choose a monthly or yearly subscription. Once you choose, follow the prompts on the screen to complete your purchase through the App Store/Play Store.
If you would like to purchase multiple subscriptions or are interested in multi-user discounts, please visit the FAQ:
How much does it cost for a subscription to LandGlide® ?
A subscription to LandGlide® is $9.99 per user per month or $99.99 per user per year. These subscriptions will auto-renew for your convenience. You will be prompted to purchase after the free trial ends.
We also offer a multi-user discount with LandGlide® through our Corporate Accounts. To learn more, please see the FAQ:
Does LandGlide replace the need for a professional Survey?
No, using LandGlide does not replace the need for a professional Survey. The property lines are for reference only; they are not intended to represent actual surveyed property lines and are not to be used for legal purposes.
How accurate are the parcel lines in LandGlide®?
The parcel lines within our database are fairly accurate. The property lines are not intended to represent actual recently surveyed property lines and are not recommended to use for legal purposes. Counties will rely on deeds and plats of record regarding disputes in the property lines. If you are concerned about the parcel lines displayed in LandGlide®, please reach out to us at support@landglide.com with the county and state in question.
How often is the data in LandGlide® updated?
We are continuously adding and updating our data. Our data is updated by county. We update over 90% of the counties each year and of that, 70% are updated every 6 months. When you tap the summary information for a parcel at the bottom of the screen, the details screen will appear with more information about that property. This screen shows you when the data was last updated for this county. To view a full list of our counties and the date last updated, please click here.
Why isn’t there owner and/or address information for the area I’m searching?
We offer data for over 3,000 U.S. counties. Available attributes vary by county so it’s possible that we do not have the attribute information for the area you’re searching. You can view this page of our website for detailed coverage and attribute information for all of the counties we have: http://reportallusa.com/counties.php.
Why don’t I see any parcels lines or data for the area I’m searching?
We offer parcel boundary data for 3,200 U.S. counties. There’s a chance we do not have data for the area you are searching. You can view this map on our website to see the coverage area we have (in green) for the U.S. http://reportallusa.com/map
Does LandGlide have international data?
Yes! LandGlide has gone international! You can now access LandGlide on your mobile device in the US, Canada, Australia, and New Zealand.
Please note: Measurements are set to a US standard and may need to be converted to metric for international use. Our Measurement Tool allows for metric measurements.
Please see our FAQ here for a brief overview of the tool.
Get Started with a Free Trial.
Free for your first seven days.
$9.99/mo or $99.99/yr thereafter.
Download LandGlide for Mobile


LandGlide also offers corporate account licenses for businesses of every size.